

")
")
")
")
Philips Zoom Whitespeed (Zoom Dual Kit Free)
OverView
Whitening LED AcceleratorFor fast ORDERING experience Visit our new site  www.medicabasket.com
NOTE: Due to volatility in dental market, Price and stock shown here are tentative and needed approval of supplier, Although we update frequently. Our Team will your order soon.
COD is not available now.
Call/ WhatsApp on +91-9313922999 / +91-9810283698

- Information
-
Dental Brands
- 3M Espe
- 3M Unitek
- A.J. Wilcock
- Agfa
- American Orthodontics
- Ammdent
- Anabond
- Angelus
- API Ashoosons
- API Instruments
- Apple Dental
- Being Foshan
- Bestodent
- Bien Air
- BIOLASE
- Blossom
- Bombay Dental
- Capri
- Captain Ortho
- Cerkamed
- Colgate
- Coltene Whaledent
- Confident
- D-Tech
- Danville
- Denext
- Dental Books
- Dental-Avenue
- Dentaurum
- Dentium
- Dentsply
- Desires ortho
- Detax Dental
- Diadent
- Dispodent
- DMG
- DPI
- Durr Dental
- Eighteeth
- Eltee Instruments
- Endoking
- Euronda S.P.A
- Fgm
- Fuji film
- G&H
- GC
- Gen-XT Implant
- Gendex
- Genoray
- Green Guava
- Hahnenkratt
- Heraeus Kulzer
- Horico
- Hu-Friedy
- ICPA
- Ids Denmed
- IMDSL Laser
- Itena
- Ivoclar Vivadent
- J Morita
- Jota
- Kalabhai
- Kavo
- Kerr
- Kodak
- Labomed
- Leone
- Libral
- Life Steriware
- Maarc
- Mani
- Marathon
- MDC
- Medicept
- Meta
- Modern ortho
- Moriz
- Navadha
- Neelkanth
- NeoEndo
- Novabone
- NSK
- Oracura
- Orateek
- Orchestrate O3D Aligner
- Ormco
- Oro
- Ortho Classic
- Ortho Organizers
- Ortho Technology
- Orthocare
- Orthosource
- Premier
- Prevest
- Prima Dental
- Pulpdent
- Pyrax Dental
- Rabbit Force Ortho
- Rejove 32Watts Aligners
- RS Dental Chair
- Ruby Dental
- Ruthinium
- Saeshin
- Samit
- Scheu
- SDI
- Septodont
- Shivam Dental
- Shofu
- SK Surgicals
- Skydent
- SS-White
- Strong
- Sun Medical
- Sure Endo
- Surgiwear
- Tokuyama
- TP Orthodontics
- Unicorn
- Unident
- Unique
- Vatech
- VDW
- VeeCare
- Vita
- Voco
- VRN
- W&H
- Waldent Equipment
- Waldent Instruments
- Waldent Material
- Woodpecker
- Zhermack
- Zoom
- Triodent
- Other brands
- Offers & Combos
- Contact Us
-
Product Category
- Composites & Restoratives
- Dental Education
-
Dental Equipment
- Air-Motor
- Apex Locators
- Autoclaves & Sterilizers
- Dental Air Compressor
- Dental Chair
- Dental Chair Accessories
- Dental Handpiece
- Dental Laser
- Dental Loupes
- Dental Surgery
- Endo Motor
- Handpiece Cartridge
- Implant Motors
- Intraoral Camera
- LED Light Cure
- Micromotors
- Microscope
- Radiology
- Suction Units
- Ultrasonic Scalers
- UV Chamber
- Dental Lab
- Endodontics
- Implantology
- Instruments And Burs
- New Clinic Setup Kits
- Oral Surgery
- Paedodontics
- Periodontics
- Prosthodontics
- Sterilization & COVID-19 Supplies
- General Dentistry
-
Ortho Store
- Arch Wires & Springs
- Bonding Adhesives
- Elastomerics
- Expansion Screws
- Headgear accessories
- Laboratory Products
- Mini TAD Screw
- Molar Bands and Tubes
- Ortho Attachments
- Photographic Accessories
- Weldable Accessories
- Braces or Brackets
- Clear Aligners
- Orthodontic Appliances
- Orthodontic IPR solutions
- Orthodontic Instruments
- Find Your Dentist
- Medica Basket
Your shopping cart is empty!
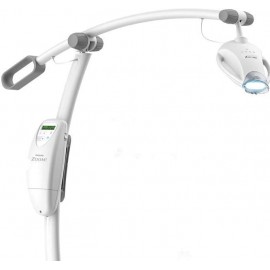
Whitening LED Accelerator
- Light Guide
The Light Guide is designed to ensure proper distance and alignment to maintain correct light exposure on the smile zone. Remove Light Guide from Kit and place on end of Accelerator Head. Turn on the Accelerator using power button located on the side of the Power Pack. When the Light Guide is properly attached, the Power Pack display will read Guide Status-Guide Attached followed by X of X Sessions. Each new Light Guide is loaded with four 15-minute activation sessions. - The Accelerator is a in-office teeth whitening light designed to be used by dental professionals for use in whitening discolored teeth. The Accelerators LED light source has been designed to deliver the optimal spectrum of light energy to activate Philips Zoom Light-Activated In-Office Whitening Gel to deliver upto 6 to 8 shades of teeth whitening. Wavelength emissions are between 250 to 550 nanometers(nm) and the energy intensity delivered to the teeth can be set at three levels depending on patient and case type.
Features:
- Wavelength emissions are between 400 to 505 nanometers(nm) and the energy intensity delivered to the teeth can be set at three levels depending on patient and case type.
- The Accelerator must be used at all times in accordance with the terms and conditions of the Letter of Agreement (LOA) provided and signed prior to delivery of the Accelerator
- The Accelerator is an in-office teeth whitening light designed to be used by dental professionals for use in whitening discolored teeth.
- The Accelerator’s LED light source has been designed to deliver the optimal spectrum of light energy to activate Philips Zoom! Light-Activated In-Office Whitening Gel to deliver up to 6-8 shades* of teeth whitening.
Key Specifications:
TECHNICAL DATA:
| Input ratings | 100-240V~, 3A, 50-60 Hz |
| Classification | Class 1 Type BF, IPXO, Equipment not suitable for use in the presence of flammable mixtures |
| Operating mode | Continuous |
| Operating |
|
| Transport and storage |
|
| Light source | LED Array |
| Bandwidth | 400 - 505 nanometers normal |
| Cooling | Air Cooled |
| Height | 136cm / 53.5 in |
| Weight | 11 kg / 24 lbs |
Directions To USE:
Accelerator Assembly
- Remove all items from shipping carton.
- Snap the casters into the feet of the Accelerator Base and lock the casters.
- Place the Accelerator Base upright on the floor. Insert the Accelerator Stand into the Accelerator Base by aligning the pin in the Accelerator Stand with the slot in the Accelerator Base and pushing the Stand securely into place.
- Assemble the lock washer with the big teeth facing each other and place it on the bolt, followed by the Fender (large) washer. Reaching under the Accelerator Base, screw the bolt into the bottom of the Base, securing it to the Accelerator Stand.
- To attach the Accelerator Head, loosen the knobs by the socket at the end of the Accelerator Boom by 4-5 turns. Gently, but firmly, push the Accelerator Head into the socket. It will be held securely in place by the socket springs.
- Place the Accelerator Boom onto the Accelerator Stand by carefully aligning the hole in the Boom with the hole in the yoke. Insert the screw into the hole and tighten. Keep tightening the screw until it is completely in the pocket. The screw should be flush or inset into the pocket. The screw has glue on the threads (yellow in color) that releases as the screw is tightened. Therefore it is important to finish tightening the screw upon insertion or the glue may stop the screw from being fully inserted.
- Connect the electrical cord from the Accelerator Boom to the cords from the Accelerator Stand and the Accelerator Head. The Accelerator head connector must be turned until you feel it lock into place.
- When you are ready to test the Accelerator, activate the unit by turning on the main power switch on the right side of the Power Pack.
Align Accelerator Head and Light Guide to Retractor
Once whitening gel application is complete (see Kit manual for instuctions), raise back of chair so patient is in a slightly reclined position (45 degree angle) and able to swallow comfortably while maintaining light pressure on bite block. Slide Acceleratorinto place next to patient. Accelerator Boom should be movable, but stable.
To align the Accelerator Head:
- Grasp the Accelerator Head with one hand and bring it close to the patients mouth. Use your other hand to lift or lower the Accelerator Boom as needed to make sure Accelerator Head is aimed directly at the patients teeth.
- Use both hands to finalize positioning of Accelerator Head so that Light Guide and IsoPrep Retractor slots are aligned. Tighten Accelerator Head and Accelerator Boom knobs. Lock casters in position. While engaged, the Light Guide and IsoPrep Retractor will allow the Accelerator Head to follow minor movements of the patients head to ensure proper alignment.
Running a whitening procedure cycle
Each Philips Zoom! Light-Activated In-Office Whitening Procedure consists of three 15-minute whitening sessions with a pause between each session to allow the operator to remove and replace the whitening gel. Each Light Guide includes a fourth session for use on patients with shades A3 or darker.
- Ensure the patient is properly prepared according to the Kit manual with whitening gel and all protective barriers in place.
- Press the “Intensity” button to toggle through high, medium, and low light intensity until the desired intensity is selected. This setting can be changed at any time during the whitening procedure.
- Press the “Start” button to turn on light and activate session timer.
- Once light is on, a countdown will be displayed. The Accelerator will beep once when 3 minutes are remaining and beep three times in the final 3 seconds of the 15 minute session. When time reaches zero, light will turn off and a long beep will sound.
- Point out to the patient that progress of each session will be tracked by 4 white lights on top of the Accelerator Head, each indicating one quarter of a session.
- If a session must be interrupted, press the “Pause” button. The remaining session time will blink on the display. To reactivate the session, press either the “Pause” or “Start” button. DO NOT PRESS THE “STOP” BUTTON AT ANy TIME DURING THIS PROCESS OR AN ENTIRE 15-MINUTE SESSION WILL BE LOST.
- At the end of each 15-minute session, the display will indicate the number of remaining sessions left on the Light Guide. Press “Start” to activate the light for the next session.
- When all sessions on a Light Guide are used, the display will read “Sessions Complete” for three seconds, followed by “Guide Status – Replace Guide”. Detach the Light Guide from IsoPrep Retractor and pull Accelerator away from patient.
Warranty:
1 Year Warranty against the manufacturing defect
Packaging:
- 1 Whitening LED accelerator
- 2 Dual patient kits