


Dmg Mixstar Emotion
OverView
Mixstar Em...For fast ORDERING experience Visit our new site  www.medicabasket.com
NOTE: Due to volatility in dental market, Price and stock shown here are tentative and needed approval of supplier, Although we update frequently. Our Team will your order soon.
COD is not available now.
Call/ WhatsApp on +91-9313922999 / +91-9810283698

- Information
-
Dental Brands
- 3M Espe
- 3M Unitek
- A.J. Wilcock
- Agfa
- American Orthodontics
- Ammdent
- Anabond
- Angelus
- API Ashoosons
- API Instruments
- Apple Dental
- Being Foshan
- Bestodent
- Bien Air
- BIOLASE
- Blossom
- Bombay Dental
- Capri
- Captain Ortho
- Cerkamed
- Colgate
- Coltene Whaledent
- Confident
- D-Tech
- Danville
- Denext
- Dental Books
- Dental-Avenue
- Dentaurum
- Dentium
- Dentsply
- Desires ortho
- Detax Dental
- Diadent
- Dispodent
- DMG
- DPI
- Durr Dental
- Eighteeth
- Eltee Instruments
- Endoking
- Euronda S.P.A
- Fgm
- Fuji film
- G&H
- GC
- Gen-XT Implant
- Gendex
- Genoray
- Green Guava
- Hahnenkratt
- Heraeus Kulzer
- Horico
- Hu-Friedy
- ICPA
- Ids Denmed
- IMDSL Laser
- Itena
- Ivoclar Vivadent
- J Morita
- Jota
- Kalabhai
- Kavo
- Kerr
- Kodak
- Labomed
- Leone
- Libral
- Life Steriware
- Maarc
- Mani
- Marathon
- MDC
- Medicept
- Meta
- Modern ortho
- Moriz
- Navadha
- Neelkanth
- NeoEndo
- Novabone
- NSK
- Oracura
- Orateek
- Orchestrate O3D Aligner
- Ormco
- Oro
- Ortho Classic
- Ortho Organizers
- Ortho Technology
- Orthocare
- Orthosource
- Premier
- Prevest
- Prima Dental
- Pulpdent
- Pyrax Dental
- Rabbit Force Ortho
- Rejove 32Watts Aligners
- RS Dental Chair
- Ruby Dental
- Ruthinium
- Saeshin
- Samit
- Scheu
- SDI
- Septodont
- Shivam Dental
- Shofu
- SK Surgicals
- Skydent
- SS-White
- Strong
- Sun Medical
- Sure Endo
- Surgiwear
- Tokuyama
- TP Orthodontics
- Unicorn
- Unident
- Unique
- Vatech
- VDW
- VeeCare
- Vita
- Voco
- VRN
- W&H
- Waldent Equipment
- Waldent Instruments
- Waldent Material
- Woodpecker
- Zhermack
- Zoom
- Triodent
- Other brands
- Offers & Combos
- Contact Us
-
Product Category
- Composites & Restoratives
- Dental Education
-
Dental Equipment
- Air-Motor
- Apex Locators
- Autoclaves & Sterilizers
- Dental Air Compressor
- Dental Chair
- Dental Chair Accessories
- Dental Handpiece
- Dental Laser
- Dental Loupes
- Dental Surgery
- Endo Motor
- Handpiece Cartridge
- Implant Motors
- Intraoral Camera
- LED Light Cure
- Micromotors
- Microscope
- Radiology
- Suction Units
- Ultrasonic Scalers
- UV Chamber
- Dental Lab
- Endodontics
- Implantology
- Instruments And Burs
- New Clinic Setup Kits
- Oral Surgery
- Paedodontics
- Periodontics
- Prosthodontics
- Sterilization & COVID-19 Supplies
- General Dentistry
-
Ortho Store
- Arch Wires & Springs
- Bonding Adhesives
- Elastomerics
- Expansion Screws
- Headgear accessories
- Laboratory Products
- Mini TAD Screw
- Molar Bands and Tubes
- Ortho Attachments
- Photographic Accessories
- Weldable Accessories
- Braces or Brackets
- Clear Aligners
- Orthodontic Appliances
- Orthodontic IPR solutions
- Orthodontic Instruments
- Find Your Dentist
- Medica Basket
Your shopping cart is empty!
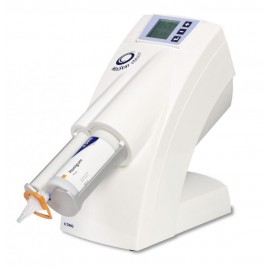
Mixstar Emotion HIGH-SPEED DESIGN.
The new DMG MixStar-eMotion is a fully automatic mixing device for impression materials. To accommodate individual preferences the device can be operated at 3 different speed levels. All speed levels are electronically controlled and regulated to ensure a consistent speed even with viscous consistencies. To ease the practice routines for dentists and staff two timers can optionally be programmed for working time and time in mouth settings. And the recommended time values for each process are specified on the pre-filled MixStar cartridges. The mixing process is started by simply pushing the Start button allowing you to guide the tray with both hands. For a hands-free operation an optional foot switch pedal can be connected to the unit. The integrated USB interface is used to upgrade the software.
HIGH-SPEED DESIGN.
Fully automatic mixing with electronic perfection.
Mixing has never been easier, faster and so safe: With MixStar-eMotion, DMG presents the latest generation of fully automated impression material mixing.
Using the high-tech device is child’s play. The MixStar-eMotion can be controlled with only one hand by means of a quick push-button operation – incorrect dosages are impossible. And its stylish design also impresses visually in the practice.
Versatility included.
Regardless of your impression material and technique preferences: the MixStar-eMotion truly makes your daily work easier. For fully-automated use, there is an extensive range of high-quality DMG impression materials to choose from. The device is also compatible with conventional pre-filled cartridges and foil bags.
HIGH QUALITY FOR ALL APPLICATIONS.
Honigum: An entire family for highest precision
Typically, impression materials are either especially flowable or stable. Honigum, however, overcomes these opposites. Thanks to its patented rheologically active matrix Honigum yields best results in both disciplines. As a result, the prestigious "Dental Advisor" awarded Honigum with the best clinical rating* of all 50 tested vinyl polysiloxanes. Honigum-Heavy was also recommended for implant impressions by the renowned Brånemark Center, thanks to its outstanding fixation capacity. And Honigum-MixStar Putty provides a real putty material for fully automated mixing from the MixStar cartridge.
StatusBlue:
The VPS for all alginate indications
Due to its high dimensional stability, impressions taken with StatusBlue neither shrink nor swell. Thus allowing for easy long-term storage of the impression for weeks and ensuring exact fit.
The long shelf life also allows an impression to be poured several times. Repeat or multiple impressions, due to fracture of a temporary for example, are thus no longer necessary. In a comparison of "alginates and alginate replacement materials" performed by the US test institute "The Dental Advisor", StatusBlue received the highest rating of all materials.**
Besides StatusBlue and Honigum, the tried and tested Silagum-MixStar Putty Soft is available for use with the MixStar-eMotion as well.
The optimized MixStar cartridges have color-coded locking-systems to distinguish between the different product variants. The labels also indicate the respective working time and the setting time in the mouth for easy orientation and the prevention of errors.
STATE-OF-THE-ART AUTOMATIC MIXING
Easier
Using the MixStar-eMotion is child’s play. A push of a button is all it takes for fully automated dosing, mixing, and application, with electronic precision. With this device, unlike others available on the market, the start button does not need to be held down during the mixing and dosing process. This makes work particularly easy and hands-free. To make things even easier the unit features two timer functions for the working time and the setting time in the mouth, which allows you to program, store and easily retrieve the respective times for the different impression materials.
Faster
The MixStar-eMotion is the only mixing device featuring three different speed levels, the highest of which delivers twice as fast as its predecessor model, the MixStar. For loading the tray, for example, you can save up to 20 seconds, thus gaining additional working time for the material. The different speed levels were implemented in order to optimize the impression taking process. Whether you load syringes or trays, you’re an experienced or novice assistant: The MixStar-eMotion offers the right speed for every situation.
Safe.
In an electronically controlled manner the MixStar-eMotion provides an invariably homogeneous and bubble-free material quality. The material always comes optimally dosed into the tray or syringe – and you can be sure to have worked economically since material waste is reduced to a minimum. By programming and storing the correct working and setting times, mixing and impression errors can be prevented. The appropriate times are specified on the DMG MixStar cartridges to further support an error-free treatment procedure.
KEY SPECIFICATIONS :
TECHNICAL DATA:
Housing made from high impact resistant resins, hazard class I, type B
| Dimensions H x W x D | 370 x 180 x 430 mm (14.5 x 7.08 x 17”) |
| Weight | 8,9 kg (19.58 lbs) |
| Ambient temperture | +5 to +40°C |
| Recommended operating temperature | +18 to +40°C |
| Time for plungers to return to cartridge exchange position from most forward position | 11 seconds incartridge exchange position |
| Power supply | 115 V 30 V |
| Frequency | 60 Hz 0 Hz |
| Fuse [2 x type] | T 4A, 250 V 2A, 250 V |
| Output | 200 W = 200 VA |
| Duty cycle | up to 2 min |
| Pause | minimum 5 min. |
| USB connector | Mini USB B type 5 pin |
DIRECTIONS TO USE :
Cartridge gauge
Indicates amount of material left in cartridge. The cartridge gauge blinks as long as the level cannot be determined or if the last two level indicators have been reached and only enough material for loading one tray remains in the cartridge.
Timer 1
Timer 1 is used for setting the working time for the material used. The timer counts down with the start of the mixing process. A long acoustic signal indicates the end of the working time.
Timer 2
Timer 2 is used for programming the material’s setting time. The countdown starts as soon as the mixing process is completed. Three acoustic signals indicate the end of the setting time.
Program display
The unit provides storage space for 99 timer settings and an easy recall function.
Standby indicator
If the unit is not used for 10 minutes the display switches to standby mode. By pressing any of the buttons it is reactivated automatically.
Mixing speed
Unless a menu is selected the mixing speed can be increased by pressing the Plus button [8] or decreased by pressing the Minus [9] button.
Three speed levels are available.
Level 1 Slow mixing speed
Level 2 Medium mixing speed
Level 3 High mixing speed
Software version
The software version currently installed in the unit is indicated in the lower right corner for 2 seconds when the unit is turned on.
Cartridge indicator
The cartridge indicator shows that a cartridge is inserted and ready for use. If (with the cartridge inserted) the indicator shows a crossed-out cartridge symbol the cartridge is not inserted correctly.
Forward indicator
If the forward indicator symbol is displayed the plungers can move forward. The symbol blinks when the plungers progress quickly toward the material. During the mixing process the symbol is fully illuminated.
Reverse indicator
If the reverse indicator symbol is displayed the plungers can move backwards. The symbol blinks when the plungers retract quickly from the material. Once the cartridge exchange position is reached the symbol is no longer displayed.
Getting started
1. Put MixStar on a flat surface
2. Connect the power cord to the unit and to the power supply
3. Switch the unit on with its toggle switch [1] on the back of the device. All indicator lights on the display will blink for approx. 2 seconds following the unit’s brief internal self-test.The cartridge symbol is crossedout if no cartridge is inserted or the cartridge is not seated properly. If a cartridge has already been inserted into the unit the level indicator will blink until the level is determined (after advancing the plungers). For safety reasons the unit operates only when a cartridge is inserted.
Using a foot switch (optional)
If the optional foot pedal is used plug the foot pedal connector into the port on the back of the MixStar-eMotion and tighten the screw connection. Pressing down on the foot pedal mixes and delivers the impression material. The process stops when the foot pedal is released
Preparing a cartridge for use
1. Slide locking mechanism into open position. Do not remove the locking mechanism from the cartridge
2. Remove and discard the cartridge cap
3. Attach a new mixing tip. Make sure the mixing tip is properly seated
4. Secure the mixing tip by sliding the locking mechanism to locking position
5. Leave used tips on the cartridge after use. They serve as a cap
6. Insert the cartridge from the top into the unit. A short acoustic signal will sound when the cartridge is seated properly. Fresh cartridges are ready for use after the first 3 cm of impression material have been extruded and discarded.
Loading a tray
The simple two-button or foot pedal control leave both hands free to operate the tray. The mixing speed can be increased or decreased by pressing the Plus button [8] or the Minus button [9], which is possible during extrusion as well
1. Start mixing by pressing the Start/Stop button or by operating the foot pedal. If Timer 1 is set its countdown will start now. The end of the working time is indicated by a long acoustic signal. If a new MixStar cartridge is used discard the first 3 cm of the newly mixed material. Carefully follow the manufacturer’s instructions for the selected material. For a clearer display all elements for which no new settings are made (-:--) are hidden after the Start/Stop button is pressed
2. Tilt the tray slightly under the mixing tip to load it. To avoid entrapment of air leave the mixing tip immersed in the impression material while filling the tray continuously with the material
3. After the tray has been sufficiently loaded stop dispensing by pressing the Start/Stop button or by releasing the foot pedal. Mixing is stopped at once and pressure on the cartridge is relieved to avoid any further flow of the material. If Timer 2 is set its countdown will start now. 3 acoustic signals indicate when the material can be removed from the mouth. The unit stops dispensing automatically after 2 minutes but can be restarted by pressing the Start/Stop button
Exchanging a cartridge
1. The cartridge can only be removed if the plungers are in cartridge exchange position. If necessary, press the Reverse button and wait until the plungers return to their original position. The Reverse indicator [J] blinks during plunger retraction. When the plungers reach the cartridge exchange position the Reverse indicator is no longer displayed
2. Release the cartridge from the cartridge compartment by pressing with one hand from below the openings and remove it from above. Leave used mixing tip on the cartridge after use. It serves as a cap
3. Insert the new cartridge into the unit from the top (see »Preparing the cartridge for use«, step 5). In order to use up the material in the cartridge keep a new cartridge with attached mixing tip ready before starting the mixing process. That way you ensure that the remaining material in the old cartridge does not have to be discarded as the working time limit would be exceeded while exchanging the cartridge.
Attaching a mixing tip
Attach a new mixing tip before each mixing process
1. Slide locking mechanism into open position
2. Discard the old mixing tip. If the cartridge was stored for a longer period of time be sure to check the openings for possible blockings and remove them
3. Align the mixing tip with respective outlets on the cartridge and attach it to the cartridge
4. Lock the mixing tip with the locking mechanism on the cartridge. Attach a new mixing tip before each mixing process. The device is unable to deliver impression material through material that has cured in the mixing tip. If the mixing tip is not properly attached to the cartridge material may be pressed past the mixing tip and cause soiling
Setting the timer
The unit provides memory for 99 timer settings. The timers are used to set the specific working time [B] and time in mouth [C] for the material used. The maximum time setting is 9:59 minutes. An acoustic signal indicates when the set time expires (0:00) and the timer is reset to the previous time setting. The previous time setting kept in memory even when the unit is turned off. You assign your settings to a fixed program memory (D) and access them by recalling the respective program. The unit can be operated with both, one, or none of the timers. The device is supplied with preconfigured programs according to the DMG material specifications
1. Press the Menu button briefly. The program display is selected and blinks
2. Select a program memory to store the timer settings. Use the Plus button and Minus button to scroll through the programs. Keeping either of the buttons pressed scrolls through the programs in steps of 10. Pressing one of the two buttons briefly opens one setting at a time.
3. Pressing the Menu button again acknowledges the program selection. Timer 1 is selected and blinks. If the timer is selected pressing the Plus button or Minus button will increase or decrease the time setting in increments of seconds to the next minute. Keeping the button pressed counts in increments of minutes. Pressing one of the buttons again sets the seconds. Pressing the Menu button briefly selects Timer 2 which is set as described above. For the working time and time in mouth values please refer to the material manufacturer’s instructions. When programming Timer 2 to the specified setting time please remember to add the required transfer time (end of mixing process until insertion into the mouth)
4. Pressing the Menu button closes the menu and saves the settings under the respective memory number. A short acoustic signal confirms that the settings are saved. If you press the Start/Stop button before saving the settings the menu closes. Unsaved settings will be lost.
FEATURES:
- Fully automatic
- Delivery twice as fast as with the previous MixStar model
- 3 selectable speeds
- 2 timers for working and setting times
- Easy to use and quick processing
- Suitable for foil bags and cartridges
PACKAGING:
- 1 Unit